Tag Archives: FrameMaker

Unique use of AutoFM for PDF generation

The localization team at medical technology company came to us with an interesting automation request. As part of their localization process, all files for a given language and deliverable are provided in multiple ZIP files in a single folder. The ZIPs contain the following:

  • FrameMaker book file (optional)
  • MIF file(s)
  • “variables” file (optional)
  • image files

They wanted to automate the assembly and PDF generation of the book rather than needing to put it all together manually. This task involves the following logic:

  1. Start FrameMaker.
  2. Open all MIF files and save them as FM binary files.
  3. If a book file exists, open it (otherwise, just one file is used).
  4. If a file with “_VRB” in the name exists, import the variable definitions from that file into all FM files in the book.
  5. Update the book.
  6. Save the book or single FM file to a PDF (using a pre-defined job options file).
  7. Exit FrameMaker.

The user workflow should be as follows:

  1. Copy ZIP files into a folder on the user’s desktop.
  2. Right-click the folder, and select “GeneratePDF”

We were able to quickly develop a prototype of this process using the AutoFM plugin. This handled the bulk of the work in opening the files in FrameMaker, converting from MIF to FM, importing the variables, updating the book, and generating the PDF.

All that was needed was some type of script or utility to drive the whole process. This entails, unzipping the files into a temporary folder, analyzing the contents, and generating the AutoFM script (a simple XML file that is passed to FrameMaker on startup to perform the specified actions). This could be developed as a compiled EXE utility, or as some type of script. We opted for a Perl script because of the reduced effort in development and because it would be easier to modify in the future. The “right-click” functionality is handled by adding a batch file in the Windows “SendTo” folder.

The Perl script took a couple hours to develop and test, and now the localization team can quickly and reliably generate a PDF from the provided content.

This is just one example of how you could use AutoFM to automate tasks with FrameMaker. The AutoFM process is driven by an XML “script”, but it can perform various tasks on all types of FrameMaker files. It can also run additional scripting within FrameMaker (ExtendScript, FrameScript, FDK client), to perform whatever custom processing is required.

Working with DITA Codeblocks in FrameMaker

When using a DITA <codeblock> element, the intent is for all of the code to be enclosed in a single <codeblock> element (to the extent that it makes sense). From time to time I see documents where each line is in a separate <codeblock>. While this may “work,” it’s not an idea way to operate. If the intent was to put single code lines in a <codeblock>, it would have been called “codeline”!

Here’s the one-line-per-codeblock approach (not ideal),
codeblocks-wrong

and here’s the recommended method.
codeblocks-right

If you’re using FrameMaker, this can happen without consciously realizing it. You may insert a <codeblock>, type the first line and press ENTER, then type the next line and press ENTER again. Each time you press ENTER, you’re creating a new <codeblock> element.

Another problem can happen when you copy and paste from a text file. You insert a <codeblock> then paste the code that you copied from the source file. It looks reasonable (except for the “end of paragraph” symbols), and you save the file and move on.
after-paste

The next time you open the file, the code is all messed up, it’s essentially all on one line that may wrap down the page. Not at all what you had intended!
reopen-after-paste

In order to properly format a <codeblock>, you need to end each line with a “forced return” (aka. “soft return” or “line break”); press the SHIFT+ENTER keys to get a new line. If you do this, your lines will be properly formatted and will remain as a single block of code.

The “trick” to pasting in content from another file is as follows:

  1. Insert the <codeblock> element, then place the insertion point inside the element and paste the code.
  2. Open the Find dialog and select the <codeblock> element.
  3. Enter “\p” as the Find text, and enter “\r” as the Change text.
  4. Select “Look in: Selection” and choose Change All.

before-replace

This is what you’ll see after replacing the end of paragraph (Pilcrow) symbols with forced returns.
after-replace

Does this code have tabs? It’s typically a good idea to replace tabs with spaces (not required, but a good practice). Use the same process to replace all tabs with 4 spaces (or whatever makes sense for your code).

  1. Open the Find dialog and select the <codeblock> element.
  2. Enter “\t” as the Find text, and enter “␣␣␣␣” (4 spaces) as the Change text.
  3. Select “Look in: Selection” and choose Change All.

Of course .. if you’re using FM11 or FM12, you can always just switch to the XML Code View and paste the code directly in there! As long as the code doesn’t include angle brackets, which you’ll need to manually replace with entities (&lt; and &gt;), and tabs, which you’ll need to replace with spaces, this option works great!

(Be aware that in FM11, the Code View feature has a problem with indented code lines. It’s likely that any indents will be lost if you flip between WYSIWYG and Code View. FM12 has fixed this problem.)

The techniques above work equally well for the other “preformatted” elements, <pre>, <msgblock>, and <screen>.

That all works fine with DITA 1.1 files, but if you’re using DITA 1.2, you can take advantage of the <coderef> element! A <coderef> is just what it sounds like, a reference to a code file. Essentially it’s a “conref” to a non-DITA file used for code samples. A <coderef> must be inserted into a <codeblock>, and if needed you can include multiple <coderef> elements in a <codeblock> or mix hard-coded text with a <coderef>, it’s up to you.

The default FrameMaker DITA support (in FM11 and FM12) doesn’t properly handle <coderef> elements, hopefully that will be fixed in an update to FM12. But if you are using DITA-FMx 2.0, you can use this feature. See the blog post Using Coderefs in DITA-FMx for details.

If you’re interested in the possibility of using syntax-based formatting in your code samples in FrameMaker, watch for the CodeFormatter plugin from Leximation. It’s currently in beta testing, but will be available soon. This is intended as a “publishing plugin” for the DITA-FMx book-build process (the formatting is applied when the book is built), but can be used as a stand-alone command or called from other scripting, so it can be used even if you’re not using DITA-FMx.

Custom scripting in the DITA-FMx book-build process

One of the popular features in DITA-FMx is its ability to generate a PDF-ready FrameMaker book and files from a DITA map. The idea is that these files are actually PDF-ready .. one click to build the book, quick review (optional), then save to PDF. Because you can define all of the setup and publishing properties in a book-build INI (ditafmx-bookbuild.ini to be precise) that is saved with each book file, you’re able to reliably and accurately regenerate the FM files for each DITA map without worrying about getting the settings right each time. This saves time and ensures accuracy and consistency.

One feature of the book-build process is the option to include custom processing in the publishing process. DITA-FMx provides many useful publishing features, but there’s always the need to perform some additional processing to achieve formatting that is specific to your needs.

The Run Custom Script option provides the ability to run one or more FDK client (plugin) command, ExtendScript, or FrameScript, at the end of the default book-build process so you can perform whatever additional processing you need. This eliminates the need to make any manual tweaks to the generated files and ensures that your output always looks the same.

If you want the same script to run for all book-builds, you can set this option through the DITA-FMx > DITA Options dialog. In the Options dialog choose the Book Builds button and on the Book Build Settings dialog you’ll see the Run Custom Script option.

fmx-custom-script

If you’re running an ExtendScript, enter “ScriptingSupport” in the Client field, and the full path (using the forward slash as directory delimiter) to the script file name in the Args field (for FrameScript, use “fsl” in the Client field).

Yes .. that’s the easy part. I suppose you want to know how to create a script?

Here’s an example of an ExtendScript that applies a background color to all elements in your files that have the @status attribute set to “changed” or “new”. You might not want to use this for the final PDF, but it’s a nice way to flag new and changed content for your reviewers.

Just copy this code to a new file named tag-changes.jsx (or whatever you’d like), and place that file in a known location on your file system. It doesn’t really matter where you put it, you just need the full path and file name  for the “Args” field in the Run Custom Script settings. (You can download the file from here .. tag-changes.jsx.)

/* 
 * ExtendScript to set a background color on elements 
 * with @status='changed' or @status='new' in all 
 * files in book 
 *
 */
Console("Running ExtendScript on book."); 
// get the active book
var book = app.ActiveBook;
// get the first component in that book
var comp = book.FirstComponentInBook;
// iterate over all components
while (comp.id) 
{
  // get the component name (file name)
  var compName = comp.Name;
  // open that file (ok if already open)
  var doc = SimpleOpen (compName, false);
  // print a message to the console
  Console("Processing: "+compName); 
  // call our function to perform the processing
  fnProcessDoc(doc);
  // get the next component and loop back
  comp = comp.NextComponentInBook;
}

// function that starts the processing of a document
function fnProcessDoc(doc)
{
  // get the root element in the file
  var rootElem = doc.MainFlowInDoc.HighestLevelElement;
  // run function to process all elements in the file 
  // .. (if it's structured)
  if (rootElem.id) {
    fnProcessElements(doc, rootElem);
  }
}

// iterative function to walk through all elements 
function fnProcessElements(doc, elem)
{
  // get the value of the status attribute
  var statusVal = fnGetAttributeValue(elem, "status");
  // check if value is "new" or "changed"
  if ((statusVal == "new") || 
      (statusVal == "changed")) 
  {
    // set the background color to "Green"
    fnSetBackgroundColor(doc, elem, "Green") ;
  }
  // scan for more elements
  var child = elem.FirstChildElement;
  while (child.id) {
    fnProcessElements(doc, child);
    child = child.NextSiblingElement;
  }
}

// function to get the specified attribute value
function fnGetAttributeValue(elem, attrName)
{
  var attrVal = "";
  var attrs = elem.GetAttributes();
  for (n=0; n<attrs.len; n++) {
    if (attrs[n].name == attrName) {
      attrVal = attrs[n].values;
      break;
    }
  }
  return attrVal;
}

// function to set the background color
function fnSetBackgroundColor(doc, elem, colorName) 
{
  var color = doc.GetNamedColor(colorName);
  // check that the color is valid
  if (color.ObjectValid()) {
    var setVal = new TypedVal();
    setVal.valType = Constants.FT_Integer;
    setVal.ival = true;
    doc.SetTextVal(elem.TextRange, 
        Constants.FP_UseBkColor, setVal);
    setVal.valType = Constants.FT_Id;
    setVal.obj = color;
    doc.SetTextVal(elem.TextRange, 
        Constants.FP_BkColor, setVal);
  }
  else {
    Err("Invalid color: " + colorName + "\n");
  }
}

If you’re using a book-build INI file, you can add these settings in the BookBuildOverrides section:

[BookBuildOverrides]
...
RunScript=1
ScriptName=ScriptingSupport
ScriptArgs=C:/publishing/scripts/tag-changes.jsx

When you run the DITA-FMx > Generate Book from Map command, this script will run and your files will be processed accordingly.

If you want to run multiple scripts (or different types of scripts, ExtendScript + FDK plugin), you just use the vertical bar as a delimiter in the ScriptName and ScriptArgs values (be sure to start with a vertical bar). The following example shows how to run the tag-changes script followed by the StructureSnippets plugin.

[BookBuildOverrides]
...
RunScript=1
ScriptName=| ScriptingSupport | Pubs-Tools:StructureSnippets
ScriptArgs=| C:/scripts/tag-changes.jsx | RUNSNIPPETSCRIPT

For FDK plugins, the ScriptName is the “client name” as defined in the maker.ini file, and the ScriptArgs value will vary depending on how that plugin was set up.

This Run Custom Script feature makes it so you can tailor the way FM files are generated from a DITA map to exactly suit your needs. Don’t let anyone tell you that PDFs from DITA have to be boring or ugly!

FrameMaker 11 Review: XML and Structured Authoring

Despite the fact that FrameMaker was one of the first authoring tools to support structured authoring (FrameBuilder and SGML in 1991 then FrameMaker and XML in 2002), it is still seen by many as purely a book authoring and publishing tool. While it excels at long document production and provides excellent page layout and formatting capabilities, it also offers a robust XML authoring interface and related features. However, in the XML community, it’s generally not taken seriously as an XML editor. The release of FrameMaker 11 may start to change this perspective.

One of first things that people may say when asked about FrameMaker and XML editing is, “you can’t see the angle brackets, so it’s not an XML editor!” Well, with FrameMaker 11, you now have a real Code view authoring option. This isn’t just a simple text editor, it’s a real XML code editor with many of the productivity features you’d expect in a professional XML editor.

FrameMaker 11 is packed with lots of features, for both structured and unstructured authoring. In this review, I’ll just be focusing on the structured authoring and XML features. I was involved in the FrameMaker 11 prerelease testing, and have had the opportunity to offer suggestions and report bugs during the development cycle. I’m quite pleased with the way this release has turned out, although I am one of those people who always wishes that the “bake time” was just a bit longer.

Performance is always on the list of new features. Adobe claims that DITA maps and topics open faster in FM11. To be honest, with my working files I’m not seeing a significant change from FM10, although we’re talking about an open time of a few seconds, even for large maps, so I wouldn’t expect much improvement there. In tests of extreme cases of element use, I do start to see some significant improvement with FM11. I’m seeing a decrease in file open times of up to 92%; that’s a pretty significant change. One document (100 pages with very dense use of inline elements) took over 7 minutes to open in FM10, and only 36 seconds in FM11. Wow. While this test may not represent real-life content, it does show that some serious work was done to speed things up.

Smart Paste is a new feature that lets you copy and paste from HTML or other rich text sources like Word, and automatically have the styles converted into your structured model. FM11 comes pre-configured to support Smart Paste into DITA, but you can customize this feature to work with any data model. This will be a huge time savings when migrating existing content. The resulting element structure may not be exactly what you want, but it’s much better than the old way of copy and paste. I think that this will be a very popular feature.

Banner Text is a new feature that provides a clickable label text in newly inserted elements to help guide the author as to the type of content to place in an element. Values such as “title text” or “list item” are defined in the EDD, and you can change them to suit your needs. When combined with the ability to set up boilerplate (or “straw man”) content through the use of the element auto-insertion feature in the EDD, you can make it much easier to start writing a new topic, and will make it easier for people to get more comfortable with structured authoring. The default DITA templates are set up this way.

Authoring of structured documents (and XML files) has been made even easier through some new keyboard shortcuts. Pressing CTRL+1 displays a popup list of all valid elements at the current insertion point. Not only can you easily select an element to insert, but this list also lets you select multiple levels (as deep as the model supports) of child elements so that with one click you can insert many levels of nested elements. CTRL+2 does the same thing but lets you wrap the current selection with the selected structure. CTRL+3 provides a change option.  CTRL+7 gives you quick access to setting an attribute value. I love the ability to insert multiple elements with one click!

Another great new keyboard shortcut displays an inline attribute editor. Use Esc,i,a,e to pop up a small window that allows selection and entry of attribute values at the current insertion point. Yes, that’s a bit of a long “shortcut,” but you’ll get used to it!

Now you can easily author XML files without creating a structure application. One common complaint about using FrameMaker as an XML editor was the belief that you had to create a structure application in order to edit an XML file. Although this wasn’t strictly true, it wasn’t entirely obvious how to work with XML files without a structure application. Now one of the New File options is “Empty XML,” which is just that, an XML file that isn’t linked to a DTD or structure application. You can quickly create an XML file of any arbitrary model, or one that’s linked to a DTD for validation, but no structure application is required. You can also open up and edit any XML file, as you’d expect from an XML editor.

Whitespace handling has been greatly improved. Because the Code view mode includes a pretty printing option, the system is designed to handle pretty printed content without trouble. In the past it was often problematic when you were working in a mixed editor environment, and some people pretty printed their content. This should no longer be a problem!

FrameMaker adds two new authoring views in addition to the standard WYSIWYG view. You can now work in “Author mode,” a stripped down WYSIWYG view, which lets you focus on the content rather than thinking about the formatting or page layout. You can also work in “Code view,” which provides access to the underlying XML coding if you prefer to see the “real” XML under the hood.

Code View!

Providing a Code view option in FrameMaker is huge. It’s definitely not something that all FrameMaker users will use, but there are times that you really do need to modify the underlying XML coding, and this provides you with that option. There are people who are more comfortable editing code directly, and this lets them do that right inside of FrameMaker. No need to use another XML editor just because you want access to the XML coding. What’s nice is that FrameMaker remains in the authoring mode you last used. So if you’re in Code view, and you quit for the day, when you come back the next day and open an XML document, it’ll start off in Code view.

Code view has all of the productivity enhancements that you’d expect in an XML editor. Standard features like line numbering, syntax coloring, and code folding, make it very easy to work with large documents. Also, as you type, you are presented with auto-suggest popups for element and attribute names as well as automatically adding the closing element tag. Because of the runtime XML validation, any invalid coding is indicated with a squiggly underline as well as being reported in the Errors panel, if that is enabled (View > Pods > Errors).

Code view also offers an XML Tree view pod. This is a simplified version of the standard Structure view pod available in the WYSIWYG view, but is really just used for easy viewing and selection of element groups. Unfortunately, you can’t use this view to move elements, maybe in an update?

Code view also provides an XPath parser to allow flexible searching in the current file, all files in a map, or all files in a folder. This will greatly simplify the process of locating that content that you know is somewhere on the file system. Once authors get comfortable with basic XPath syntax, this will be very popular. It would be great to see this method for searching for files available in the other authoring views, not just in Code view. One caveat, which will hopefully be fixed in an update, if you perform an XPath search on a folder, you’ll get errors for files in that folder that are not parsable, such as FM binary files. Not a big deal, just a little annoying, since you’d expect it to just skip those files silently.

In addition to XPath support, Code view also provides the ability to run an XSLT transformation on the current file, all open files, or all files in a folder. You can create XSL scripts that perform various operations, and just pop over to Code view to run the script as needed. Granted, not all FrameMaker users will be writing their own XSLT scripts, but once they start to see the power behind it, more people will give it a try.

Yes, there are a couple of problems in Code view:

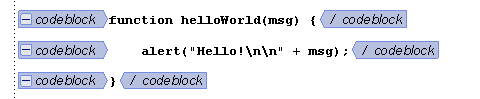
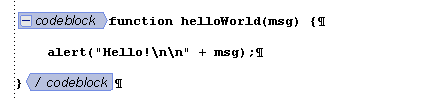
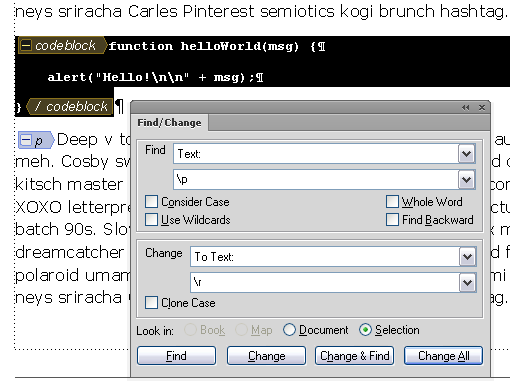
Preformatted content can run into trouble when passed through the Code view. If you’re working with a data model that includes elements like a <codeblock> or <pre>, the content in those elements should not be indented via the pretty printing process. Unfortunately, in FM11 it currently is, which will likely cause formatting problems in your output. I’m hoping that this is something that will be addressed in an early update, but until it is you may want to avoid opening files in Code view that contain preformatted elements.

Another problem with Code view is one that affects older systems that have a single single processor core (or virtual machines with only one core assigned). If you’re one of these groups you can pretty much forget about using Code view in any useful manner. Apparently the XML validation requires two processor cores, so systems with one, will notice a serious lag time between keypresses. This can be mitigated by selecting “No Application” for the structured application name, but that’s not really a good solution in the long run. While this should only affect a small number of people, it’s pretty serious if you’re one of those people. I’m personally hoping that this is at the top of the “fix” list.

DITA Support

As with the previous release, FrameMaker 11 continues to support the DITA 1.2 specification (as well as DITA 1.1). A number of fixes have been made that make it easier to work with FrameMaker in a mixed editor environment and issues have been resolved that created potentially non-compliant DITA topics.

URI notation (for href, conref, etc. attributes) now properly uses the forward slash as the directory delimiter instead of the backslash. A setting in the Options dialog controls this feature. Make sure that “URI Notation for Paths” is selected, and your files will be compliant in this regard.

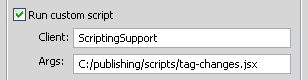
Cross-reference format names are now stored in the xref/@outputclass attribute rather than the @type attribute, making this feature compliant with the DITA specification. When opening topic files created in earlier releases of FM, your format names will be migrated to the proper attribute. However, note that migrated topics will contain both attributes going forward unless you do something to strip out the @type values. It seems like you’d want the invalid values removed from the @type attribute (so it could be set to the value of the target topic type), but perhaps this will make for an easier transition from earlier versions of FM since it will continue to work properly in both environments. If you are migrating to FM11 and not planning to go back to editing topics in earlier versions of FM, you should set up a script of some kind to strip out the old @type values. (This might be a good use of the new XSLT transformation feature!)

By default, maps open in the Resource Manager, which makes for a very nice map editor. While this is a very useful and efficient view for most map editing operations, such as inserting and arranging topics, it does not yet allow for editing of relationship tables. You’ll need to switch to Document view for that (same as in FM10). Also, the new cool keyboard shortcuts for working with elements and attributes (described earlier) don’t seem to work in the Resource Manager. When you do switch your map to Document View, you’ll see an odd looking structure with your topicref titles shown twice, once for the clickable label and once for the navtitle element. Would be nice to get this cleaned up at some point.

Unfortunately, frontmatter and backmatter elements are not supported in FM11. When you try to insert a <toc> or <indexlist> element in a bookmap, you’ll be required to specify a target file. Because these elements represent generated lists, there’s typically no reason to specify a target file. Add this to the list of things I hope are fixed, sooner rather than later.

DITA map publishing has been greatly enhanced. Now when you save a DITA map to a book with components, the resulting files will have the pagination and numbering applied and any generated files will be included (TOC, Index, etc.). These properties are defined in the ditafm-output.ini file (found in %appdata%\Adobe\FrameMaker\11). This INI file also lets you specify that the “chapters” are aggregated FM files rather than multiple FM files as nested topics (GenerateFlatBook=1), as well as other options for controlling the output. The enabling of generated lists is done through this INI file as well, which is a bit odd, since the DITA bookmap structure provides a perfectly nice model for this purpose. In fact, if your bookmap does specify frontmatter and backmatter, this will be ignored, and only the lists defined in the INI file are used.

I think that the enhanced map publishing is a big step in the right direction, but it falls short of being as useful as it could be. For one, there’s only one INI file. This assumes that all of your books use the exact same properties and generated lists, which is likely not the case. Also, it’s a shame that the generated lists aren’t enabled by the existence of the associated frontmatter or backmatter elements in the map being processed. Finally, it would be really nice if this INI file was to some degree exposed through a user interface, frequently editing an INI file is a bit cumbersome.

Summary

In my opinion, FrameMaker can now be considered a full featured XML editor. That combined with its ability to perform impeccable page layout functions, makes it the ideal authoring and publishing tool for all types of documents and workflows. If I could have only one editor, FrameMaker would certainly be that tool. If you’re an existing FrameMaker user, you should definitely download the trial or give this new release a test drive. If you’re in the market for an XML editor, don’t rule out FrameMaker before you try it; compare the features and benefits of FrameMaker with other XML editors, and you may see that it’s quite the worthy competitor.


Automated DITA to PDF Publishing with FMx-Auto

If you’re publishing PDFs from DITA and want high quality with minimal effort, you should consider using DITA-FMx and FMx-Auto. If you’re already using FrameMaker and DITA-FMx, FMx-Auto will enable you to create the same PDFs you’re getting through manually saving the FMx-generated book to a PDF, using scripting or batch processing.

If you’re currently generating PDFs through an XSL-FO based process, and aren’t satisfied with the quality of those PDFs, FMx-Auto will enable you to take advantage of FrameMaker’s layout and formatting capabilities, while still using another XML editor for authoring. These tools support all versions of FrameMaker from FM7.2 on up through 10.

DITA-FMx and FMx-Auto can be installed with FrameMaker Server to provide a PDF publishing solution linked to your CMS or other server-based publishing process.

Just because you’re using DITA doesn’t mean that you have to give up high-quality PDFs!

  • DITA-FMx provides features to control the formatting and layout of a PDF generated from a DITA map. These features are easier to use than similar options you might find in other PDF creation tools.
  • FMx-Auto unlocks the API in DITA-FMx so you can automate the book and PDF creation process. An FMx-Auto installation includes the AutoFM plugin as one way to drive this automation.
  • AutoFM is an XML-based scripting tool for automating processes within FrameMaker. In this case it is used to open a DITA map and run the DITA-FMx Map to Book process to create a fully formatted FrameMaker book, then save that book to a PDF.

See how easy it is to get well formatted PDF output from a DITA map using FMx-Auto and DITA-FMx. This video provides a quick (5 minute) overview of the entire PDF publishing process using FMx-Auto.

» Link to video on YouTube.

Information and download:

Apple iBooks Author and Adobe FrameMaker?

First let me point out that I’m a bit of a Mac-head. After 30+ years of using “IBM PCs” I made the switch to Macs a little over two years ago. Mac desktop (Mini), Mac Server (Mini), Mac laptops (MacBook and MacBook Pro), not to mention the iPhones and iPad. Yeah, completely jumped ship. I do still perform most of my work on Windows, but it’s all in VMs (Virtual Machines) on Apple hardware. It was the best move I’ve ever made .. far more productive, and far fewer problems (both hardware and software). From my perspective, Windows runs best on a Mac.

So, because I’m a late-comer to the Mac world, I wasn’t terribly bothered when FrameMaker dropped the Mac platform (in retrospect, it seems like a bad move, but that’s not the point). Frame works great in my Windows VM .. no problems at all. The fact that it’s not a native Mac application doesn’t really matter to me since I’m usually working in that VM.

I’ve been using FrameMaker for 20+ years, and not only use it for authoring and publishing of content (mostly software and technical manuals), but I also develop plugins and tools for FrameMaker. FrameMaker has its detractors, but in my opinion it’s a very solid authoring and publishing tool for both structured and unstructured content. I like it.

I’ve also been involved with eBook development for the past couple of years, and find that to be an exciting new option for publishing. There is no “perfect” path for creating an eBook from FrameMaker .. lots of options, some better than others depending on your needs, but they all have issues that typically require manual tweaking of the output.

With the release today of Apple’s iBooks Author application (free, but requires the Lion OS), I thought it might be good to explore how this tool potentially fits into the technical document publishing workflow. Also to see if this tool might be a replacement for FrameMaker in certain situations.

In case you missed all of the hype (info and video here), iBooks Author is Apple’s answer to making it easy for authors and publishers to create beautiful and highly interactive eBooks. This syncs up with their effort to provide interactive textbooks for students as eBooks. One caveat is that these eBooks can only be used on the iPad (not even the iPhone, for now), and in fact the license agreement requires that the output from this application can only be used on the iPad and sold through the iTunes bookstore. I won’t get in to whether that’s a good thing or not, but if the iPad is a target device for your content, this may be a useful tool.

If you’re familiar with Apple’s Pages application, you’ll feel quite comfortable with iBooks Author .. it looks like they cloned Pages to make this tool.

First hurdle .. how do you get content from FrameMaker into iBooks Author? IBA appears to only import content from an Apple Pages file or a MS Word DOC file. (No XML import and not even an RTF import.) FrameMaker exports to RTF, which you can open in Word and save to a DOC file. Once you’ve got a DOC, you can then insert that file as a “chapter” or a “section” into the IBA file (iBooks Author files have an IBA extension). When adding the DOC file to the IBA you have the option of preserving your document styles, but regardless of the setting of this option, your style names are all lost (as far as I can tell). All paragraphs are tagged with a style name of “Free Form”. YIKES. As a hard-core style user, that sounds like a really bad thing to do. Hopefully I’m missing some option to maintain style names .. if not, that’s a serious flaw. However, even without any style tweaks, the default appearance does look pretty decent.

Update 29 Jan 2012! Sorry .. looks like I was wrong about that. Selecting the “Preserve styles option” does maintain paragraph and character styles (and style names) on import.

When I tried the import process on some of my content, it seemed to have trouble with conditionalized text. This text looked fine in Word (after the export from Frame), but after importing into IBA, the first character of each conditionalized paragraph was missing. If you make use of conditions in FrameMaker, be sure to watch for this. Also, it appears that cross-references don’t convert into anything useful on the IBA side, and referenced images are lost.

Let’s assume that your content has been successfully imported into an IBA file. You’ll need to create the cover and title pages as well as set up the copyright and other frontmatter. You can import directly into pages of these types, or just insert a copyright section page and copy+paste into that page. An interesting “feature” of eBooks created from IBA is that there is a separate table of contents for each chapter. You’ll need to be sure to tag paragraphs appropriately for them to show up in each TOC.

One of the really interesting things about this tool is its ability to add various types of interactive graphics (called Widgets). These can be simple things like a gallery of images (swipe left and right to see more) and movies or audio files. Or, you can create more complex objects like multiple choice review questions, or interactive images with callouts that pop up when tapped. You can also embed a Keynote presentation, interactive 3D images, and HTML content. All of this must be manually created.

When you want to preview your book, just plug your iPad into your computer, and click the Preview button. Within a minute, you’ll be able to page through and review/test the iBook you’ve created.

If Apple is really hoping that people will create lots of these iBooks, they should work a bit more on getting a cleaner import process. Graphics and cross-references should definitely not get deleted, and maintaining the source style names would be very helpful. Otherwise, there’s quite a bit of manual work to import your existing content and creating a new book. Granted, any of the interactive media will need to be created manually since that didn’t exist in the source.

While a conversion from FrameMaker to iBooks Author is probably not the most common workflow scenario, it may be worth the effort if your goal is to create an interactive book for the iPad. I don’t see this application replacing FrameMaker (or Word for that matter) since it really only allows for a very limited type of page-based formatting, and you can’t export to anything other than iBook, PDF, and text.

I’ll be playing with this more over the coming weeks and will post more as I explore the options.

FrameMaker: EDD, template, rules – what is all that and how does it benefit me?

People often complain that it’s too hard to edit XML files in FrameMaker. Before you can effectively edit files you need to set up a structure application for that XML model. A structure application is a set of special files and instructions that tell FrameMaker how to apply formatting to the XML tags and content in an XML file. This information is stored in a file called the structure application definition file, which contains all of the “definitions” for each structure application available to FrameMaker.

If you’re given an XML file to edit, and are provided with the structure application for that XML model, it’s easy to install the structure application files and start editing. However, if you don’t have a structure application, creating one can require a bit of effort when all you want to do is make some edits. If it’s not important to work in a WYSIWYG mode, you can edit your XML file without setting up a structure application as long as the file includes a valid reference to a DTD. You can toggle the tags on or off and make edits to the content as needed. But if you’ll be doing any significant editing, it’s likely that you’ll want some amount of formatting (even if it’s just to distinguish between block and inline elements and make headings bold). This really isn’t all that different from other XML editors that provide a WYSIWYG or “Author” editing mode. They all require some type of configuration or setup to associate elements and contexts with a particular formatted representation of those elements.

Keep in mind that although FrameMaker is often associated with book production and page layout (which it excels in), the formatting applied by your structure application does not need to use or imply page-oriented formatting. In fact, you can make the formatting look very basic, like a simple web page. Personally, I like to encourage this approach when authoring XML documents. If you’re authoring XML, you are probably producing deliverables for many different output formats, and it’s best if the author is not writing with any of those output formats in mind. When working in this way, you’ll have two structure applications, one for authoring which uses a very simple layout, and one for publishing which applies the page-based formatting that you want in a printed book.

While FrameMaker is actually very similar to other XML editors in features and functionality, it’s important to keep in mind that FrameMaker is not just another XML editor. In addition to being an editor (for both unstructured and structured documents), it is also a state of the art print publishing engine. Most (all?) other XML editors require a completely different tool in order to render the XML tags and content into a format that is acceptable for a printed page or book. With FrameMaker you get both tools in one, and with that added power comes a bit more effort up front. This is a significant advantage, and in the long run, well worth the extra effort.

I like to think of the FrameMaker XML authoring process as “front-loading” the publishing effort. Once you can edit an XML file in FrameMaker, you can also get a beautiful PDF file ready for printing or online delivery. Other XML editors may allow you to edit the XML file quickly, but in order to generate a PDF, you’ll need to learn XSL-FO (or hire someone who knows it), then buy an FO rendering engine to create the PDF. (XSL-FO is an open source language for transforming XML into PDF.) Yes, there are other options for creating a PDF from XML other than XSL-FO, but they all require considerable amount of knowledge and coding and/or a considerable amount of money.

The icing on the cake is that a PDF generated from FrameMaker is likely to look much nicer than one generated from an FO-based process. XSL-FO just does not support the same level of formatting and layout as that available within FrameMaker, no matter how much time you spend on crafting the FO stylesheets.

Granted, there can be a fair amount of effort required to create a structure application from scratch. It’s often best to start by cloning an existing structure application, but if that’s not possible, you’ll just have to make one yourself or hire a consultant to develop one for you.

The core components of a structure application are:

  • DTD (Document Type Definition). A set of markup declarations that define the elements and their relationship in an XML or SGML data model. The DTD also defines any attributes and their default values.
  • EDD (Element Definition Document). Similar in concept to a DTD, but adds a layer of context rules to allow the mapping of formatting properties to the data model based on the relationship of elements and attribute values. An EDD can be created from a DTD, but the context rules must be added to assign formatting to the document when it is opened. The context rules can assign formatting properties directly, or it can assign paragraph and character styles that are defined in the template.
  • Template. A FrameMaker file that defines the page layout properties, named paragraph and character styles, and other document-specific settings. The EDD is imported into the template file, making the template a single file that contains both the structure rules and formatting information.
  • Read/write rules. A file that defines additional properties of specific elements and how those elements are modified as the XML file is read from or written to disk.
  • XSLT import or export stylesheet. You can optionally include XSLT stylesheets that perform additional processing on the import or export of an XML file.

References to all of these files (and other settings) are included in a structure application definition in the structure application definition file. For details and to learn all that you’ll need, refer to the Structure Application Developer’s Guide (http://www.adobe.com/support/documentation/en/framemaker/).

The nice thing is that once you have the structure application, even if you didn’t create it yourself, you’re likely to be able to make adjustments to the template to affect the layout or formatting of specific elements without assistance from a consultant. This is because you’re just changing properties of a standard FrameMaker template, something that you or someone in your company has probably been doing for years with unstructured FM files. If you’re using an FO-based process, unless you have the necessary expertise in-house, you may need to hire someone to make these modifications. You’ll hear people say that once the template is “set”, you don’t need to worry about further customizations, but that doesn’t mesh with the reality of the publishing process I’ve seen. People are always making little changes.

Another nice thing about using FrameMaker as your PDF publishing tool is the ability to leverage the “generated list” feature for creation of the Table of Contents, Index, and other front or back matter lists. As with the structure application template, setting up a nice looking Table of Contents or Index is just a matter of setting up a generated list template as done with unstructured FrameMaker. No special programming knowledge required, and it’s easy to test and modify as needed.

Publishing from FrameMaker can be done “by hand” on the desktop, by creating a book file from the XML content, then applying the necessary pagination and numbering properties and adding the generated list files. Or you can set up a publishing process that’s partially or completely automated. Because FrameMaker has extensive API support (FDK, ExtendScript, and FrameScript), there are many automation options. This does require purchasing automation add-on components or coding-up your own tools, but much of this can be achieved with minimal expense and/or training.

Both Adobe Technical Communication Suite (TCS) and FrameMaker Server provide a tight integration between FrameMaker and RoboHelp, so in addition to the PDF publishing offered by FrameMaker, you can publish to various types of online Help. This can provide an alternative to using XSL as the method for converting XML into HTML-based output.

When setting up an XML publishing workflow, people are often drawn to XSL and XSL-FO as the means to transform their XML content into online and print deliverables. In some cases one or both of these are in fact the right choice. But if it’s possible that the output formatting will require frequent modifications or if the level of formatting is not sufficient for your needs, FrameMaker is likely to be the best solution.

Because FrameMaker is a standards-compliant XML editor, it can be used in an authoring environment along side other XML editors. FrameMaker can also publish XML content that was authored in other XML editors. The great thing about XML is that it frees your content from being tied to a proprietary authoring or publishing tool. That doesn’t mean you won’t still need to use proprietary tools, you just have the flexibility to mix and match those tools as needed. Your task is to choose the right tools to match your needs. Keep in mind that FrameMaker is not just another XML editor, it might just be the best XML editor for your needs!

— Scott Prentice, President of Leximation, Inc.
Developer of DITA-FMx and FMx-Auto, tools that provide extended DITA authoring and publishing features in FrameMaker.


This article was also posted to the Adobe Technical Communication Blog.

Myth #2: FrameMaker is only appropriate for printed books

While it is true that FrameMaker excels at the creation of printed content and PDF files, there is absolutely no reason that it should be limited to the creation of chapter-based and book-centric content. FrameMaker works with files, you get to decide what those files represent .. books, chapters, sections, topics, or snippets. For years, people have been using FrameMaker along with tools like Mif2Go, WebWorks, and others, to create both PDF/print output as well as numerous online formats. In those workflows, people generally authored in unstructured, chapter-based files.

With the growing popularity of XML (and DITA in particular), FrameMaker can still be used to author content in a chapter-oriented paradigm, but it can also be used to author individual topics just as easily as any other XML editor. Using DITA maps to organize the topic files (which may represent books, chapters, or other collections). These map and topic can then be passed to external processing tools (like the DITA Open Toolkit) to be generated into specific deliverable formats, and can also be processed within FrameMaker to be assembled into books.

You might suggest that authoring in FrameMaker forces people to think in a book-centric manner because of the print format of the WYSIWYG authoring view. Although this may be the way you’ve seen FrameMaker used, this is completely up to you as the author to format the authoring view however it makes sense for your workflow and writers. When opening an XML file, you select a structure application to use, which applies a template which defined the way the content is rendered on screen. You can set up this structure application with a print-focused layout or you can choose to use fonts and a layout that looks very simple.

One example of this is found in the default DITA-FMx 1.1 Topic application which has no indents, uses Verdana as the font throughout and looks more like a web page than a printed book. If you choose to create a PDF from the DITA map and use the default Book application, the print formatting is applied. But while authoring, using the Topic application, you are encouraged to focus on the content rather than the formatting since it’s likely that you are creating deliverables for multiple output formats, of which print (PDF) is only one.

Just because FrameMaker has traditionally been the standard tool for authoring long documents doesn’t mean that it can’t be used for topic-based authoring as well. It is a very flexible and customizable authoring tool, which should be evaluated carefully with other tools when selecting an appropriate XML editor.

PDF Publishing with DITA-FMx 1.1

FrameMaker and DITA-FMx provide the easiest and least expensive way to get the highest quality PDF output from your DITA content. In addition to the numerous authoring features in DITA-FMx, it also provides many useful publishing options. Some of the more popular are listed below:

  • Add related links from relationship tables
  • Flatten conrefs and ensure that links are functional in PDF output
  • Apply ditaval filtering to the generated book files
  • Move figure titles so the follow the image
  • Enable table titles to display on all pages for tables that span pages
  • Assign proper numbering and pagination throughout the book
  • Replace “list” files with generated FrameMaker lists (e.g. TOC, Index)
  • Run custom scripts to perform additional pagination and cleanup

See how easy it is to get properly formatted PDF output from a DITA map using DITA-FMx. This video walks you through the basic process of configuring DITA-FMx for PDF publishing.

If you’re a new user of DITA-FMx or are considering a purchase, you should review this video.

» Link to video on YouTube.

Myth #1: FrameMaker isn’t a “real” XML editor

Well .. I guess you’d have to define “real XML editor,” but if by real you mean that the editor can open XML files on disk, and write the edited XML back to disk, then it’s as real as any other XML editor that I’ve seen. All XML editors have different features, and you may prefer one editor over another because of its features. But FrameMaker is definitely a real XML editor, because it can open, edit, and save XML files.

I hear people say that FrameMaker’s not a real XML editor because it uses a proprietary binary format and you can’t edit the XML tags directly. The truth is that all XML editors convert the XML on disk to some internal binary format while the file is open for editing. That’s how you get that nice tag coloring and fonts. Just because the XML you’re editing looks like the XML you think is in the file, that’s just eyewash. Granted, FrameMaker doesn’t let you edit the XML structure by entering tag names in angle-bracketed code, but that doesn’t change the fact that you are editing the same XML structure that you would with any other XML editor. It’s just a different rendering of the XML on disk than you’ll see in other tools. (It would be nice if FM provided a “code view” .. I hope that’s added in the future.)

FrameMaker does provide a number of views into the structure of the XML. It offers a “structure view” which is a collapsible tree of element nodes, allowing you to easily modify attribute values and rearrange the elements by dragging and dropping the nodes into new locations. It also offers a “tags view” which lets you see the element boundaries and their names in the content authoring window (similar to a code view, but you can’t actually edit the tags directly).

FrameMaker is actually one of the oldest XML editors on the market. There are valid reasons to use an XML editor other than FrameMaker, but the issue of it not being a “real XML editor” is not one of them.