In order to create a custom AIR Help application, you must first install the Flex and AIR SDKs. I’ll walk you through the simple installation process, then give you some sample AIR Help source files to test.
This process assumes that you’re not using Flash Builder or another IDE for development. If you are using an IDE, these SDKs are likely to already be installed, and you can skip down to step #3 and start playing with the samples.
0) Make sure that Java is installed.
Some of the Flex and AIR build tools are Java utilities, so you must have Java JRE 1.5 or higher installed. This is only required for the AIR Help developer; Java is not required for the end user.
1) Download and install the Flex SDK.
Download from .. www.adobe.com/go/flex4_sdk
The Flex SDK is platform independent; there is one SDK for all platforms, Mac, Windows, and Linux.
After downloading, copy the archive file to a folder on your file system and extract the contents. On my computer, the Flex SDK will end up in the following locations:
- Mac/Linux: /Users/USERNAME/Tools/Flex/flex_sdk_4
- Windows: C:\Tools\Flex\flex_sdk_4
2) Download and “overlay” the AIR SDK.
Download from .. www.adobe.com/go/air_sdk
A separate download is provided for the Mac, Windows, and Linux versions of the AIR SDK; download the version appropriate for your OS.
After downloading, copy the archive file to your Flex SDK folder (flex_sdk_4) and extract the contents into that directory. On Windows, this would likely be a Right-click > Extract All. On a Mac you’ll need to go into a Terminal window, navigate to the Flex SDK folder, and execute the following command:
tar jxvf AdobeAIRSDK.tbz2
If you have trouble overwriting files due to file permissions, try using sudo before that command.
This overlay process will copy the AIR SDK files into the existing Flex SDK folder structure and may replace a few files with newer versions.
3) You are now ready to start coding, testing, and compiling your own AIR Help applications!
To help you do this, I’m providing some sample files.
Download .. airhelp-hello.zip v.0.01
These sample files are set up for people compiling their AIR application from the command line. If you’re using Flash Builder or another IDE, you should be able to use the Flex source files, but won’t need the provided batch/script files.
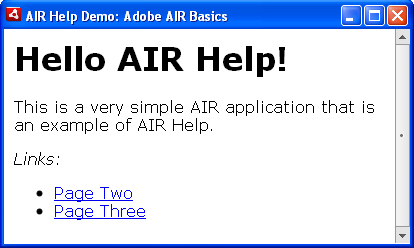
airhelp_hello_html – This is a very simple example of an HTML-based AIR application which is is basically a custom web browser. All of the layout, formatting, and functionality is controlled by the HTML files and any JavaScript within them. It contains a help folder with a few HTML files. Feel free to replace those files with some of your own.
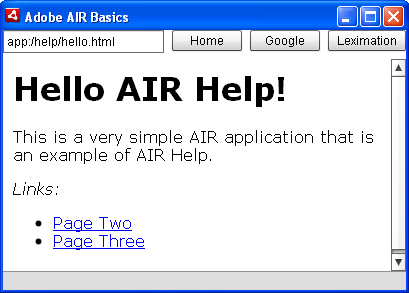
airhelp_hello_mxml – Virtually the same as the airhelp_hello_html app, but this one uses MXML to define the layout and functionality of the application. This allows you to add Flex-defined interface components and use ActionScript for programmatic interactions. This sample uses an HTML component to display the HTML content (same content as the airhelp_hello_html app), but adds some buttons and a text box to the interface. You can experiment by adding more components to your application.
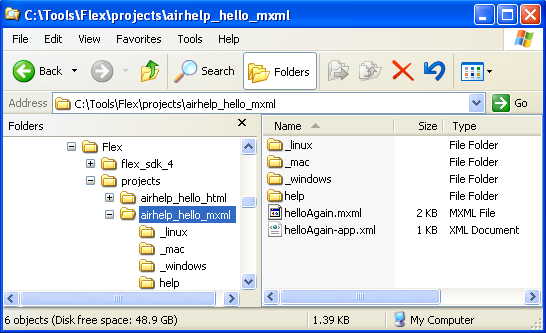
Create a Projects folder in your Flex folder. The sample files include batch/script files that are set up to work with a Flex SDK folder named flex_sdk_4 that is at the same level as your Projects folder. Other than that, the directory structure above that won’t matter. The recommended locations for the Projects folder is:
- Mac/Linux: /Users/USERNAME/Tools/Flex/Projects
- Windows: C:\Tools\Flex\Projects
Extract the contents of the airhelp_hello_* samples into the Projects folder. Your folder structure should look like the following:
Within each of the sample projects are folders named for each operating system (_linux, _mac, _windows). These OS folders contain batch and script files which run commands in the SDK.
The Mac and Linux folders contain shell scripts which are run from a Terminal window. Launch a Terminal window, then navigate to the appropriate location and run the scripts by entering their names at the prompt. For example, to test an AIR Help application without installing the AIR file, run the air-test.sh script by entering the following at a shell prompt:
./air-test.sh
The Windows folder contains batch files, which can be run by double-clicking the file in Windows Explorer.
Each of the sample projects have the same named batch/script files:
- air-cert – Creates a self-signed digital certificate. This is used for testing purposes only. Before you deliver your AIR Help file to end users you should purchase a real digital certificate. You can edit the batch/script file to change the certificate filename and password as needed.
- air-compileswf – Compiles the source files into a SWF (this is not needed for HTML-based AIR applications). Before you can test your MXML-based AIR Help, you must compile the SWF.
- air-test – Runs the AIR application in a debug mode, letting you view and test the current state of your application. The typical development process would be to edit your code, then test, then edit your code and test again.
- air-packager – Runs the packager utility to create the .air file deliverable. The .air file created by this utility can be given to colleagues for testing. If you have your own digital certificate, you’d edit this batch/script file to change the certificate file name and the password.
Download .. airhelp-hello.zip v.0.01
Give it a try and let me know how it goes. Once you’re able to compile these samples, you can make copies of the projects and change the code to experiment with your own customizations. I highly recommend using Flash Builder if you want to do some serious work with AIR Help development. It’s got a 60-day trial period, so you’ll have time to get the feel fro it before buying.
Feel free to post comments and questions and I’ll try to respond quickly with answers.