Category Archives: DITA-FMx

DITA-FMx 2.0 upgrade pricing ends April 14!

The discounted upgrade pricing from DITA-FMx 1.1 to 2.0 will end on April 14 (the 1-year anniversary of DITA-FMx 2.0). If you’re still using DITA-FMx 1.1, you can upgrade to 2.0 for $165. Just log in to www.leximation.com and go to your Tool Admin page, then click the upgrade link.

On April 14 the special upgrade price for DITA-FMx 2.0 will end and the cost will be $235 (same as a new individual license).

Note that upgrading to DITA-FMx 2.0 does not force you to change your current DITA 1.1-based structure applications. DITA-FMx 2.0 supports both DITA 1.1 and DITA 1.2. DITA-FMx 2.0 includes many enhancements and new features that benefit both DITA 1.1 and 1.2 models.

In addition to support for the DITA 1.2 features (keyref, conkeyref, coderef, key-based glossary term referencing, conref ranges, etc.), DITA-FMx 2.0 provides the following features:

  • Robust support for FrameMaker variables.
  • New Generate Book from Map dialog makes it easier to publish DITA maps to FM books.
  • Auto-prolog options now apply to maps as well as topics.
  • Automatically add author and date to <draft-comment> elements.
  • Additional support for specialized table formatting (row and cell shading and table indenting).
  • Support for imagemap and hotspot development.
  • And much more…

To compare the features in DITA-FMx with those in different versions of FrameMaker, review the FrameMaker DITA Feature Comparison.

To download a trial, or purchase DITA-FMx .. www.leximation.com/dita-fmx/.

Working with DITA Codeblocks in FrameMaker

When using a DITA <codeblock> element, the intent is for all of the code to be enclosed in a single <codeblock> element (to the extent that it makes sense). From time to time I see documents where each line is in a separate <codeblock>. While this may “work,” it’s not an idea way to operate. If the intent was to put single code lines in a <codeblock>, it would have been called “codeline”!

Here’s the one-line-per-codeblock approach (not ideal),
codeblocks-wrong

and here’s the recommended method.
codeblocks-right

If you’re using FrameMaker, this can happen without consciously realizing it. You may insert a <codeblock>, type the first line and press ENTER, then type the next line and press ENTER again. Each time you press ENTER, you’re creating a new <codeblock> element.

Another problem can happen when you copy and paste from a text file. You insert a <codeblock> then paste the code that you copied from the source file. It looks reasonable (except for the “end of paragraph” symbols), and you save the file and move on.
after-paste

The next time you open the file, the code is all messed up, it’s essentially all on one line that may wrap down the page. Not at all what you had intended!
reopen-after-paste

In order to properly format a <codeblock>, you need to end each line with a “forced return” (aka. “soft return” or “line break”); press the SHIFT+ENTER keys to get a new line. If you do this, your lines will be properly formatted and will remain as a single block of code.

The “trick” to pasting in content from another file is as follows:

  1. Insert the <codeblock> element, then place the insertion point inside the element and paste the code.
  2. Open the Find dialog and select the <codeblock> element.
  3. Enter “\p” as the Find text, and enter “\r” as the Change text.
  4. Select “Look in: Selection” and choose Change All.

before-replace

This is what you’ll see after replacing the end of paragraph (Pilcrow) symbols with forced returns.
after-replace

Does this code have tabs? It’s typically a good idea to replace tabs with spaces (not required, but a good practice). Use the same process to replace all tabs with 4 spaces (or whatever makes sense for your code).

  1. Open the Find dialog and select the <codeblock> element.
  2. Enter “\t” as the Find text, and enter “␣␣␣␣” (4 spaces) as the Change text.
  3. Select “Look in: Selection” and choose Change All.

Of course .. if you’re using FM11 or FM12, you can always just switch to the XML Code View and paste the code directly in there! As long as the code doesn’t include angle brackets, which you’ll need to manually replace with entities (&lt; and &gt;), and tabs, which you’ll need to replace with spaces, this option works great!

(Be aware that in FM11, the Code View feature has a problem with indented code lines. It’s likely that any indents will be lost if you flip between WYSIWYG and Code View. FM12 has fixed this problem.)

The techniques above work equally well for the other “preformatted” elements, <pre>, <msgblock>, and <screen>.

That all works fine with DITA 1.1 files, but if you’re using DITA 1.2, you can take advantage of the <coderef> element! A <coderef> is just what it sounds like, a reference to a code file. Essentially it’s a “conref” to a non-DITA file used for code samples. A <coderef> must be inserted into a <codeblock>, and if needed you can include multiple <coderef> elements in a <codeblock> or mix hard-coded text with a <coderef>, it’s up to you.

The default FrameMaker DITA support (in FM11 and FM12) doesn’t properly handle <coderef> elements, hopefully that will be fixed in an update to FM12. But if you are using DITA-FMx 2.0, you can use this feature. See the blog post Using Coderefs in DITA-FMx for details.

If you’re interested in the possibility of using syntax-based formatting in your code samples in FrameMaker, watch for the CodeFormatter plugin from Leximation. It’s currently in beta testing, but will be available soon. This is intended as a “publishing plugin” for the DITA-FMx book-build process (the formatting is applied when the book is built), but can be used as a stand-alone command or called from other scripting, so it can be used even if you’re not using DITA-FMx.

Using Coderefs in DITA-FMx

One of the possibly more under-appreciated features of DITA 1.2 is the <coderef> element. A <coderef> lets you include the content of a non-DITA code file within a <codeblock> element. Using a <coderef> can help to ensure the accuracy of your documentation by including real working code samples.

DITA-FMx 2.0 provides complete support for the <coderef> element. (Default FM-DITA does not support this feature.) This video provides a quick (2.5 minute) tour of authoring and publishing. For publishing, it demonstrates the use of the CodeFormatter plugin for providing syntax-based formatting of code samples in DITA-FMx.

» Link to video on YouTube.

Running a FrameScript Script from DITA-FMx

As a follow-up to Custom scripting in the DITA-FMx book-build process (which focuses on using ExtendScript), I asked Rick Quatro (FrameScripter extraordinaire) if he could provide some detailed information on setting up a FrameScript for use in the DITA-FMx book-build process.

The following is a repost (with permission) of that article (also available on Rick’s website).


DITA-FMx is a great plugin for working with DITA in FrameMaker. One of its best features is the ability to create a complete FrameMaker book from a ditamap. In some situations you may want to run a script on the book before creating the PDF. Scott Prentice, the developer of DITA-FMx, has a blog post explaining how you can call an ExtendScript script from DITA-FMx. This article will show you how to call a FrameScript script from DITA-FMx.

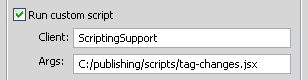
To set this up in DITA-FMx, you will need to edit the BookBuildOverrides section of the book-build INI file that you are using with DITA-FMx. Here are the three keys that need to be edited:

[BookBuildOverrides]
...
RunScript=1
ScriptName=fsl
ScriptArgs=myEventScript

RunScript is a 0 or 1 value. Setting it to a 1 tells DITA-FMx that you want run one or more scripts or FDK clients. ScriptName for FrameScript is fsl. The ScriptArgs value is the name of the installed FrameScript “event script” that you want to run.

Before we go further, let me give a little background on FrameScript scripts. FrameScript has two kinds of scripts: Standard scripts and Event scripts. A standard script can consist of functions, subroutines, and events, but it always has an entry point that is not inside of a function, subroutine, etc. Typically, you “run” a Standard script, it loads into memory, runs to completion, then is flushed from memory.

Event scripts are not run directly; they are “installed” first and then “wait” for some kind of event to happen; for example, a menu command, a FrameMaker event, an outside call, etc. All of the code in an event script must be inside of a function, subroutine, or event. The entry point for an event script is some kind of an event inside of the script. One point that is pertinent to this post is that an installed Event script has a name, and this name is the value you use for the ScriptArgs key.

Instead of installing your event script manually, it is best to install it automatically with an Initial Script, which runs automatically whenever you start FrameMaker. That way, your event script will be installed automatically when you start FrameMaker. Here is an example Initial Script:

// InitialScript.fsl Version 0.1b August 26, 2013

Local sPath('');

// Get the path to this script.
Set sPath = eSys.ExtractPathName{ThisScript};

// Install the event script that will receive the DITA-FMx call.
Install Script File(sPath+'Script1.fsl') Name('myEventScript');

This command will install the script “Script1.fsl” that is in the same folder as the Initial Script (InitialScript.fsl). The important parameter on the Install Script command is Name; the name supplied must match the name you give to the ScriptArgs key in DITA-FMx’s book-build INI file. Here we are using myEventScript.

To run this script automatically whenever FrameMaker starts, choose FrameScript > Options and click the Browse button next to the Initial Script Name field. Navigate to the InitialScript.fsl file and select it, and then click Save to close the Options dialog box.

Before you quit and restart FrameMaker, you will need to have Script1.fsl in the same folder as the InitialScript.fsl file. Here is a shell you can use for this script:

// Script1.fsl Version 0.1b August 26, 2013

Event NoteClientCall
//	
If ActiveBook
  Set iResult = ProcessBook{ActiveBook};
EndIf
//
EndEvent

Function ProcessBook oBook
//
//... Do something with the book here ...
//
EndFunc

The NoteClientCall event is a built-in event that “waits” for the outside call; in this case, from DITA-FMx. We test to make sure that there is an active book, which should be the book that DITA-FMx just created from the ditamap. If there is an active book, we call the ProcessBook function, which is where we process our book with FrameScript code. We could have our book code right in the ProcessBook function, or we could use this function to call other scripts or functions.

Please let me [Rick] know if you have any questions or comments about calling FrameScript scripts with DITA-FMx.


Thanks Rick! I’m sure that this article will be a big help to those who want to refine the DITA-FMx ditamap to PDF publishing process with FrameScript. Do contact Rick Quatro at FrameAutomation.com with any FrameScript questions or scripting needs.


Custom scripting in the DITA-FMx book-build process

One of the popular features in DITA-FMx is its ability to generate a PDF-ready FrameMaker book and files from a DITA map. The idea is that these files are actually PDF-ready .. one click to build the book, quick review (optional), then save to PDF. Because you can define all of the setup and publishing properties in a book-build INI (ditafmx-bookbuild.ini to be precise) that is saved with each book file, you’re able to reliably and accurately regenerate the FM files for each DITA map without worrying about getting the settings right each time. This saves time and ensures accuracy and consistency.

One feature of the book-build process is the option to include custom processing in the publishing process. DITA-FMx provides many useful publishing features, but there’s always the need to perform some additional processing to achieve formatting that is specific to your needs.

The Run Custom Script option provides the ability to run one or more FDK client (plugin) command, ExtendScript, or FrameScript, at the end of the default book-build process so you can perform whatever additional processing you need. This eliminates the need to make any manual tweaks to the generated files and ensures that your output always looks the same.

If you want the same script to run for all book-builds, you can set this option through the DITA-FMx > DITA Options dialog. In the Options dialog choose the Book Builds button and on the Book Build Settings dialog you’ll see the Run Custom Script option.

fmx-custom-script

If you’re running an ExtendScript, enter “ScriptingSupport” in the Client field, and the full path (using the forward slash as directory delimiter) to the script file name in the Args field (for FrameScript, use “fsl” in the Client field).

Yes .. that’s the easy part. I suppose you want to know how to create a script?

Here’s an example of an ExtendScript that applies a background color to all elements in your files that have the @status attribute set to “changed” or “new”. You might not want to use this for the final PDF, but it’s a nice way to flag new and changed content for your reviewers.

Just copy this code to a new file named tag-changes.jsx (or whatever you’d like), and place that file in a known location on your file system. It doesn’t really matter where you put it, you just need the full path and file name  for the “Args” field in the Run Custom Script settings. (You can download the file from here .. tag-changes.jsx.)

/* 
 * ExtendScript to set a background color on elements 
 * with @status='changed' or @status='new' in all 
 * files in book 
 *
 */
Console("Running ExtendScript on book."); 
// get the active book
var book = app.ActiveBook;
// get the first component in that book
var comp = book.FirstComponentInBook;
// iterate over all components
while (comp.id) 
{
  // get the component name (file name)
  var compName = comp.Name;
  // open that file (ok if already open)
  var doc = SimpleOpen (compName, false);
  // print a message to the console
  Console("Processing: "+compName); 
  // call our function to perform the processing
  fnProcessDoc(doc);
  // get the next component and loop back
  comp = comp.NextComponentInBook;
}

// function that starts the processing of a document
function fnProcessDoc(doc)
{
  // get the root element in the file
  var rootElem = doc.MainFlowInDoc.HighestLevelElement;
  // run function to process all elements in the file 
  // .. (if it's structured)
  if (rootElem.id) {
    fnProcessElements(doc, rootElem);
  }
}

// iterative function to walk through all elements 
function fnProcessElements(doc, elem)
{
  // get the value of the status attribute
  var statusVal = fnGetAttributeValue(elem, "status");
  // check if value is "new" or "changed"
  if ((statusVal == "new") || 
      (statusVal == "changed")) 
  {
    // set the background color to "Green"
    fnSetBackgroundColor(doc, elem, "Green") ;
  }
  // scan for more elements
  var child = elem.FirstChildElement;
  while (child.id) {
    fnProcessElements(doc, child);
    child = child.NextSiblingElement;
  }
}

// function to get the specified attribute value
function fnGetAttributeValue(elem, attrName)
{
  var attrVal = "";
  var attrs = elem.GetAttributes();
  for (n=0; n<attrs.len; n++) {
    if (attrs[n].name == attrName) {
      attrVal = attrs[n].values;
      break;
    }
  }
  return attrVal;
}

// function to set the background color
function fnSetBackgroundColor(doc, elem, colorName) 
{
  var color = doc.GetNamedColor(colorName);
  // check that the color is valid
  if (color.ObjectValid()) {
    var setVal = new TypedVal();
    setVal.valType = Constants.FT_Integer;
    setVal.ival = true;
    doc.SetTextVal(elem.TextRange, 
        Constants.FP_UseBkColor, setVal);
    setVal.valType = Constants.FT_Id;
    setVal.obj = color;
    doc.SetTextVal(elem.TextRange, 
        Constants.FP_BkColor, setVal);
  }
  else {
    Err("Invalid color: " + colorName + "\n");
  }
}

If you’re using a book-build INI file, you can add these settings in the BookBuildOverrides section:

[BookBuildOverrides]
...
RunScript=1
ScriptName=ScriptingSupport
ScriptArgs=C:/publishing/scripts/tag-changes.jsx

When you run the DITA-FMx > Generate Book from Map command, this script will run and your files will be processed accordingly.

If you want to run multiple scripts (or different types of scripts, ExtendScript + FDK plugin), you just use the vertical bar as a delimiter in the ScriptName and ScriptArgs values (be sure to start with a vertical bar). The following example shows how to run the tag-changes script followed by the StructureSnippets plugin.

[BookBuildOverrides]
...
RunScript=1
ScriptName=| ScriptingSupport | Pubs-Tools:StructureSnippets
ScriptArgs=| C:/scripts/tag-changes.jsx | RUNSNIPPETSCRIPT

For FDK plugins, the ScriptName is the “client name” as defined in the maker.ini file, and the ScriptArgs value will vary depending on how that plugin was set up.

This Run Custom Script feature makes it so you can tailor the way FM files are generated from a DITA map to exactly suit your needs. Don’t let anyone tell you that PDFs from DITA have to be boring or ugly!

PDFs from DITA with FMx-Auto, oXygen, and Ant

If you’re not satisfied with your current DITA to PDF workflow, you might consider FMx-Auto. FMx-Auto enables automated (scripted) publishing of a DITA map through FrameMaker and DITA-FMx. This can be integrated into most publishing workflows on the desktop or server. If you’re interested in getting high-quality PDFs from your DITA content, like you used to get from unstructured FrameMaker, this may be the solution you’re looking for.

As an example of using FMx-Auto for publishing to PDF from a popular XML editor I set up an Ant script that creates the necessary AutoFM script from the current DITA map file name, then passes that to FrameMaker. The AutoFM script instructs FrameMaker to use the DITA-FMx Map-to-Book process to create a book and chapter files from the DITA map. This book is then saved to PDF.

This Ant script can be modified to suit your needs and can be used by other tools and publishing workflows as an integration option for publishing to PDF from DITA through FrameMaker. FMx-Auto supports FrameMaker versions 7.2 through 10, so even if you’re not using Frame for authoring, you can still use it for publishing.


Best viewed at high resolution

Resources and information:

Automated DITA to PDF Publishing with FMx-Auto

If you’re publishing PDFs from DITA and want high quality with minimal effort, you should consider using DITA-FMx and FMx-Auto. If you’re already using FrameMaker and DITA-FMx, FMx-Auto will enable you to create the same PDFs you’re getting through manually saving the FMx-generated book to a PDF, using scripting or batch processing.

If you’re currently generating PDFs through an XSL-FO based process, and aren’t satisfied with the quality of those PDFs, FMx-Auto will enable you to take advantage of FrameMaker’s layout and formatting capabilities, while still using another XML editor for authoring. These tools support all versions of FrameMaker from FM7.2 on up through 10.

DITA-FMx and FMx-Auto can be installed with FrameMaker Server to provide a PDF publishing solution linked to your CMS or other server-based publishing process.

Just because you’re using DITA doesn’t mean that you have to give up high-quality PDFs!

  • DITA-FMx provides features to control the formatting and layout of a PDF generated from a DITA map. These features are easier to use than similar options you might find in other PDF creation tools.
  • FMx-Auto unlocks the API in DITA-FMx so you can automate the book and PDF creation process. An FMx-Auto installation includes the AutoFM plugin as one way to drive this automation.
  • AutoFM is an XML-based scripting tool for automating processes within FrameMaker. In this case it is used to open a DITA map and run the DITA-FMx Map to Book process to create a fully formatted FrameMaker book, then save that book to a PDF.

See how easy it is to get well formatted PDF output from a DITA map using FMx-Auto and DITA-FMx. This video provides a quick (5 minute) overview of the entire PDF publishing process using FMx-Auto.

» Link to video on YouTube.

Information and download:

PDF Publishing with DITA-FMx 1.1

FrameMaker and DITA-FMx provide the easiest and least expensive way to get the highest quality PDF output from your DITA content. In addition to the numerous authoring features in DITA-FMx, it also provides many useful publishing options. Some of the more popular are listed below:

  • Add related links from relationship tables
  • Flatten conrefs and ensure that links are functional in PDF output
  • Apply ditaval filtering to the generated book files
  • Move figure titles so the follow the image
  • Enable table titles to display on all pages for tables that span pages
  • Assign proper numbering and pagination throughout the book
  • Replace “list” files with generated FrameMaker lists (e.g. TOC, Index)
  • Run custom scripts to perform additional pagination and cleanup

See how easy it is to get properly formatted PDF output from a DITA map using DITA-FMx. This video walks you through the basic process of configuring DITA-FMx for PDF publishing.

If you’re a new user of DITA-FMx or are considering a purchase, you should review this video.

» Link to video on YouTube.

Creating New Files in DITA-FMx 1.1

DITA-FMx offers some features that make new file creation simple and easy. Entering the title for the new topic in the New File dialog box automatically creates the file name based on a format that you have defined using special building blocks. You can also create new files using “element templates” which pre-populate the topic with boilerplate content that you have set up. Prolog metadata in new files can automatically be set with the author’s name and creation date, and each time you update a file, the revision date metadata can be automatically set.

This video introduces these and other features for creating new DITA files with DITA-FMx.

If you’re a new user of DITA-FMx or are considering a purchase, you should review this video.

» Link to video on YouTube.

Overview of the Map Authoring Features in DITA-FMx 1.1

DITA-FMx 1.1 provides a number of authoring features not available in standard FrameMaker 8 or 9. Some of these features are not available in other DITA editors, and are typically found only with a content management system. This video provides a quick tour of those features.

If you’re a new user of DITA-FMx or are considering a purchase, you should review this video.

» Link to video on YouTube.