Tag Archives: DITA

Working with DITA Codeblocks in FrameMaker

When using a DITA <codeblock> element, the intent is for all of the code to be enclosed in a single <codeblock> element (to the extent that it makes sense). From time to time I see documents where each line is in a separate <codeblock>. While this may “work,” it’s not an idea way to operate. If the intent was to put single code lines in a <codeblock>, it would have been called “codeline”!

Here’s the one-line-per-codeblock approach (not ideal),
codeblocks-wrong

and here’s the recommended method.
codeblocks-right

If you’re using FrameMaker, this can happen without consciously realizing it. You may insert a <codeblock>, type the first line and press ENTER, then type the next line and press ENTER again. Each time you press ENTER, you’re creating a new <codeblock> element.

Another problem can happen when you copy and paste from a text file. You insert a <codeblock> then paste the code that you copied from the source file. It looks reasonable (except for the “end of paragraph” symbols), and you save the file and move on.
after-paste

The next time you open the file, the code is all messed up, it’s essentially all on one line that may wrap down the page. Not at all what you had intended!
reopen-after-paste

In order to properly format a <codeblock>, you need to end each line with a “forced return” (aka. “soft return” or “line break”); press the SHIFT+ENTER keys to get a new line. If you do this, your lines will be properly formatted and will remain as a single block of code.

The “trick” to pasting in content from another file is as follows:

  1. Insert the <codeblock> element, then place the insertion point inside the element and paste the code.
  2. Open the Find dialog and select the <codeblock> element.
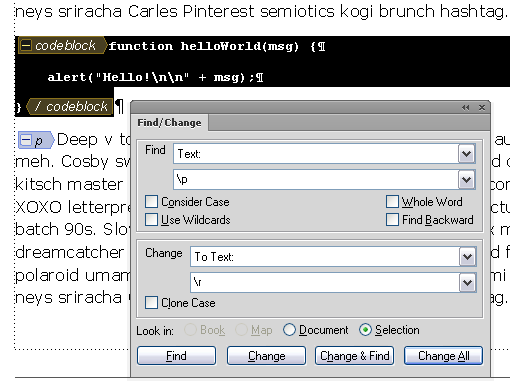
  3. Enter “\p” as the Find text, and enter “\r” as the Change text.
  4. Select “Look in: Selection” and choose Change All.

before-replace

This is what you’ll see after replacing the end of paragraph (Pilcrow) symbols with forced returns.
after-replace

Does this code have tabs? It’s typically a good idea to replace tabs with spaces (not required, but a good practice). Use the same process to replace all tabs with 4 spaces (or whatever makes sense for your code).

  1. Open the Find dialog and select the <codeblock> element.
  2. Enter “\t” as the Find text, and enter “␣␣␣␣” (4 spaces) as the Change text.
  3. Select “Look in: Selection” and choose Change All.

Of course .. if you’re using FM11 or FM12, you can always just switch to the XML Code View and paste the code directly in there! As long as the code doesn’t include angle brackets, which you’ll need to manually replace with entities (&lt; and &gt;), and tabs, which you’ll need to replace with spaces, this option works great!

(Be aware that in FM11, the Code View feature has a problem with indented code lines. It’s likely that any indents will be lost if you flip between WYSIWYG and Code View. FM12 has fixed this problem.)

The techniques above work equally well for the other “preformatted” elements, <pre>, <msgblock>, and <screen>.

That all works fine with DITA 1.1 files, but if you’re using DITA 1.2, you can take advantage of the <coderef> element! A <coderef> is just what it sounds like, a reference to a code file. Essentially it’s a “conref” to a non-DITA file used for code samples. A <coderef> must be inserted into a <codeblock>, and if needed you can include multiple <coderef> elements in a <codeblock> or mix hard-coded text with a <coderef>, it’s up to you.

The default FrameMaker DITA support (in FM11 and FM12) doesn’t properly handle <coderef> elements, hopefully that will be fixed in an update to FM12. But if you are using DITA-FMx 2.0, you can use this feature. See the blog post Using Coderefs in DITA-FMx for details.

If you’re interested in the possibility of using syntax-based formatting in your code samples in FrameMaker, watch for the CodeFormatter plugin from Leximation. It’s currently in beta testing, but will be available soon. This is intended as a “publishing plugin” for the DITA-FMx book-build process (the formatting is applied when the book is built), but can be used as a stand-alone command or called from other scripting, so it can be used even if you’re not using DITA-FMx.

FrameMaker 11 Review: XML and Structured Authoring

Despite the fact that FrameMaker was one of the first authoring tools to support structured authoring (FrameBuilder and SGML in 1991 then FrameMaker and XML in 2002), it is still seen by many as purely a book authoring and publishing tool. While it excels at long document production and provides excellent page layout and formatting capabilities, it also offers a robust XML authoring interface and related features. However, in the XML community, it’s generally not taken seriously as an XML editor. The release of FrameMaker 11 may start to change this perspective.

One of first things that people may say when asked about FrameMaker and XML editing is, “you can’t see the angle brackets, so it’s not an XML editor!” Well, with FrameMaker 11, you now have a real Code view authoring option. This isn’t just a simple text editor, it’s a real XML code editor with many of the productivity features you’d expect in a professional XML editor.

FrameMaker 11 is packed with lots of features, for both structured and unstructured authoring. In this review, I’ll just be focusing on the structured authoring and XML features. I was involved in the FrameMaker 11 prerelease testing, and have had the opportunity to offer suggestions and report bugs during the development cycle. I’m quite pleased with the way this release has turned out, although I am one of those people who always wishes that the “bake time” was just a bit longer.

Performance is always on the list of new features. Adobe claims that DITA maps and topics open faster in FM11. To be honest, with my working files I’m not seeing a significant change from FM10, although we’re talking about an open time of a few seconds, even for large maps, so I wouldn’t expect much improvement there. In tests of extreme cases of element use, I do start to see some significant improvement with FM11. I’m seeing a decrease in file open times of up to 92%; that’s a pretty significant change. One document (100 pages with very dense use of inline elements) took over 7 minutes to open in FM10, and only 36 seconds in FM11. Wow. While this test may not represent real-life content, it does show that some serious work was done to speed things up.

Smart Paste is a new feature that lets you copy and paste from HTML or other rich text sources like Word, and automatically have the styles converted into your structured model. FM11 comes pre-configured to support Smart Paste into DITA, but you can customize this feature to work with any data model. This will be a huge time savings when migrating existing content. The resulting element structure may not be exactly what you want, but it’s much better than the old way of copy and paste. I think that this will be a very popular feature.

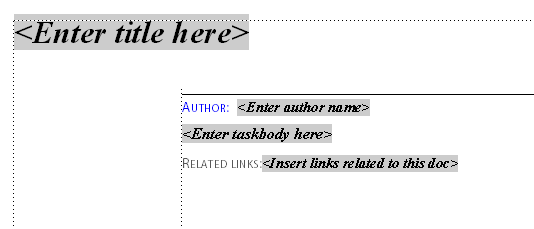
Banner Text is a new feature that provides a clickable label text in newly inserted elements to help guide the author as to the type of content to place in an element. Values such as “title text” or “list item” are defined in the EDD, and you can change them to suit your needs. When combined with the ability to set up boilerplate (or “straw man”) content through the use of the element auto-insertion feature in the EDD, you can make it much easier to start writing a new topic, and will make it easier for people to get more comfortable with structured authoring. The default DITA templates are set up this way.
Authoring of structured documents (and XML files) has been made even easier through some new keyboard shortcuts. Pressing CTRL+1 displays a popup list of all valid elements at the current insertion point. Not only can you easily select an element to insert, but this list also lets you select multiple levels (as deep as the model supports) of child elements so that with one click you can insert many levels of nested elements. CTRL+2 does the same thing but lets you wrap the current selection with the selected structure. CTRL+3 provides a change option.  CTRL+7 gives you quick access to setting an attribute value. I love the ability to insert multiple elements with one click!

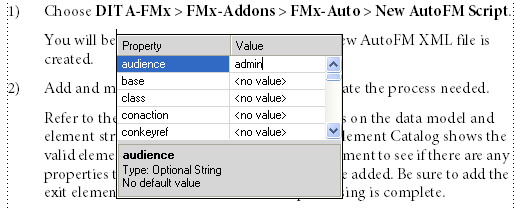
Another great new keyboard shortcut displays an inline attribute editor. Use Esc,i,a,e to pop up a small window that allows selection and entry of attribute values at the current insertion point. Yes, that’s a bit of a long “shortcut,” but you’ll get used to it!
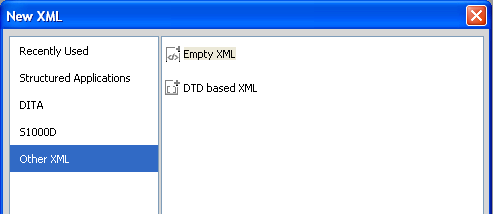
Now you can easily author XML files without creating a structure application. One common complaint about using FrameMaker as an XML editor was the belief that you had to create a structure application in order to edit an XML file. Although this wasn’t strictly true, it wasn’t entirely obvious how to work with XML files without a structure application. Now one of the New File options is “Empty XML,” which is just that, an XML file that isn’t linked to a DTD or structure application. You can quickly create an XML file of any arbitrary model, or one that’s linked to a DTD for validation, but no structure application is required. You can also open up and edit any XML file, as you’d expect from an XML editor.
Whitespace handling has been greatly improved. Because the Code view mode includes a pretty printing option, the system is designed to handle pretty printed content without trouble. In the past it was often problematic when you were working in a mixed editor environment, and some people pretty printed their content. This should no longer be a problem!

FrameMaker adds two new authoring views in addition to the standard WYSIWYG view. You can now work in “Author mode,” a stripped down WYSIWYG view, which lets you focus on the content rather than thinking about the formatting or page layout. You can also work in “Code view,” which provides access to the underlying XML coding if you prefer to see the “real” XML under the hood.

Code View!

Providing a Code view option in FrameMaker is huge. It’s definitely not something that all FrameMaker users will use, but there are times that you really do need to modify the underlying XML coding, and this provides you with that option. There are people who are more comfortable editing code directly, and this lets them do that right inside of FrameMaker. No need to use another XML editor just because you want access to the XML coding. What’s nice is that FrameMaker remains in the authoring mode you last used. So if you’re in Code view, and you quit for the day, when you come back the next day and open an XML document, it’ll start off in Code view.
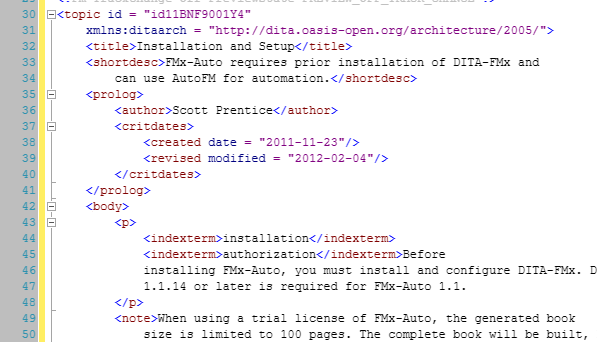
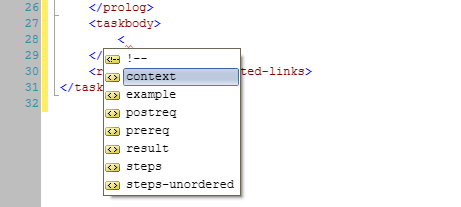
Code view has all of the productivity enhancements that you’d expect in an XML editor. Standard features like line numbering, syntax coloring, and code folding, make it very easy to work with large documents. Also, as you type, you are presented with auto-suggest popups for element and attribute names as well as automatically adding the closing element tag. Because of the runtime XML validation, any invalid coding is indicated with a squiggly underline as well as being reported in the Errors panel, if that is enabled (View > Pods > Errors).
Code view also offers an XML Tree view pod. This is a simplified version of the standard Structure view pod available in the WYSIWYG view, but is really just used for easy viewing and selection of element groups. Unfortunately, you can’t use this view to move elements, maybe in an update?

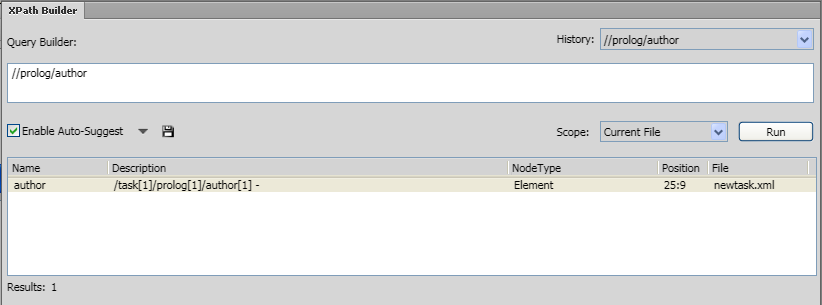
Code view also provides an XPath parser to allow flexible searching in the current file, all files in a map, or all files in a folder. This will greatly simplify the process of locating that content that you know is somewhere on the file system. Once authors get comfortable with basic XPath syntax, this will be very popular. It would be great to see this method for searching for files available in the other authoring views, not just in Code view. One caveat, which will hopefully be fixed in an update, if you perform an XPath search on a folder, you’ll get errors for files in that folder that are not parsable, such as FM binary files. Not a big deal, just a little annoying, since you’d expect it to just skip those files silently.
In addition to XPath support, Code view also provides the ability to run an XSLT transformation on the current file, all open files, or all files in a folder. You can create XSL scripts that perform various operations, and just pop over to Code view to run the script as needed. Granted, not all FrameMaker users will be writing their own XSLT scripts, but once they start to see the power behind it, more people will give it a try.

Yes, there are a couple of problems in Code view:

Preformatted content can run into trouble when passed through the Code view. If you’re working with a data model that includes elements like a <codeblock> or <pre>, the content in those elements should not be indented via the pretty printing process. Unfortunately, in FM11 it currently is, which will likely cause formatting problems in your output. I’m hoping that this is something that will be addressed in an early update, but until it is you may want to avoid opening files in Code view that contain preformatted elements.

Another problem with Code view is one that affects older systems that have a single single processor core (or virtual machines with only one core assigned). If you’re one of these groups you can pretty much forget about using Code view in any useful manner. Apparently the XML validation requires two processor cores, so systems with one, will notice a serious lag time between keypresses. This can be mitigated by selecting “No Application” for the structured application name, but that’s not really a good solution in the long run. While this should only affect a small number of people, it’s pretty serious if you’re one of those people. I’m personally hoping that this is at the top of the “fix” list.

DITA Support

As with the previous release, FrameMaker 11 continues to support the DITA 1.2 specification (as well as DITA 1.1). A number of fixes have been made that make it easier to work with FrameMaker in a mixed editor environment and issues have been resolved that created potentially non-compliant DITA topics.

URI notation (for href, conref, etc. attributes) now properly uses the forward slash as the directory delimiter instead of the backslash. A setting in the Options dialog controls this feature. Make sure that “URI Notation for Paths” is selected, and your files will be compliant in this regard.

Cross-reference format names are now stored in the xref/@outputclass attribute rather than the @type attribute, making this feature compliant with the DITA specification. When opening topic files created in earlier releases of FM, your format names will be migrated to the proper attribute. However, note that migrated topics will contain both attributes going forward unless you do something to strip out the @type values. It seems like you’d want the invalid values removed from the @type attribute (so it could be set to the value of the target topic type), but perhaps this will make for an easier transition from earlier versions of FM since it will continue to work properly in both environments. If you are migrating to FM11 and not planning to go back to editing topics in earlier versions of FM, you should set up a script of some kind to strip out the old @type values. (This might be a good use of the new XSLT transformation feature!)

By default, maps open in the Resource Manager, which makes for a very nice map editor. While this is a very useful and efficient view for most map editing operations, such as inserting and arranging topics, it does not yet allow for editing of relationship tables. You’ll need to switch to Document view for that (same as in FM10). Also, the new cool keyboard shortcuts for working with elements and attributes (described earlier) don’t seem to work in the Resource Manager. When you do switch your map to Document View, you’ll see an odd looking structure with your topicref titles shown twice, once for the clickable label and once for the navtitle element. Would be nice to get this cleaned up at some point.

Unfortunately, frontmatter and backmatter elements are not supported in FM11. When you try to insert a <toc> or <indexlist> element in a bookmap, you’ll be required to specify a target file. Because these elements represent generated lists, there’s typically no reason to specify a target file. Add this to the list of things I hope are fixed, sooner rather than later.

DITA map publishing has been greatly enhanced. Now when you save a DITA map to a book with components, the resulting files will have the pagination and numbering applied and any generated files will be included (TOC, Index, etc.). These properties are defined in the ditafm-output.ini file (found in %appdata%\Adobe\FrameMaker\11). This INI file also lets you specify that the “chapters” are aggregated FM files rather than multiple FM files as nested topics (GenerateFlatBook=1), as well as other options for controlling the output. The enabling of generated lists is done through this INI file as well, which is a bit odd, since the DITA bookmap structure provides a perfectly nice model for this purpose. In fact, if your bookmap does specify frontmatter and backmatter, this will be ignored, and only the lists defined in the INI file are used.

I think that the enhanced map publishing is a big step in the right direction, but it falls short of being as useful as it could be. For one, there’s only one INI file. This assumes that all of your books use the exact same properties and generated lists, which is likely not the case. Also, it’s a shame that the generated lists aren’t enabled by the existence of the associated frontmatter or backmatter elements in the map being processed. Finally, it would be really nice if this INI file was to some degree exposed through a user interface, frequently editing an INI file is a bit cumbersome.

Summary

In my opinion, FrameMaker can now be considered a full featured XML editor. That combined with its ability to perform impeccable page layout functions, makes it the ideal authoring and publishing tool for all types of documents and workflows. If I could have only one editor, FrameMaker would certainly be that tool. If you’re an existing FrameMaker user, you should definitely download the trial or give this new release a test drive. If you’re in the market for an XML editor, don’t rule out FrameMaker before you try it; compare the features and benefits of FrameMaker with other XML editors, and you may see that it’s quite the worthy competitor.


Automated DITA to PDF Publishing with FMx-Auto

If you’re publishing PDFs from DITA and want high quality with minimal effort, you should consider using DITA-FMx and FMx-Auto. If you’re already using FrameMaker and DITA-FMx, FMx-Auto will enable you to create the same PDFs you’re getting through manually saving the FMx-generated book to a PDF, using scripting or batch processing.

If you’re currently generating PDFs through an XSL-FO based process, and aren’t satisfied with the quality of those PDFs, FMx-Auto will enable you to take advantage of FrameMaker’s layout and formatting capabilities, while still using another XML editor for authoring. These tools support all versions of FrameMaker from FM7.2 on up through 10.

DITA-FMx and FMx-Auto can be installed with FrameMaker Server to provide a PDF publishing solution linked to your CMS or other server-based publishing process.

Just because you’re using DITA doesn’t mean that you have to give up high-quality PDFs!

  • DITA-FMx provides features to control the formatting and layout of a PDF generated from a DITA map. These features are easier to use than similar options you might find in other PDF creation tools.
  • FMx-Auto unlocks the API in DITA-FMx so you can automate the book and PDF creation process. An FMx-Auto installation includes the AutoFM plugin as one way to drive this automation.
  • AutoFM is an XML-based scripting tool for automating processes within FrameMaker. In this case it is used to open a DITA map and run the DITA-FMx Map to Book process to create a fully formatted FrameMaker book, then save that book to a PDF.

See how easy it is to get well formatted PDF output from a DITA map using FMx-Auto and DITA-FMx. This video provides a quick (5 minute) overview of the entire PDF publishing process using FMx-Auto.

» Link to video on YouTube.

Information and download:

AIR Help Primer

Before we can discuss AIR Help, you need to understand the basics of Adobe AIR. So let’s start there…

What is Adobe AIR?

Adobe AIR (Adobe Integrated Runtime) is an application development technology for creating native desktop executables that can be installed on multiple operating systems. The AIR development technology provides the developer with a rich assortment of user interface components as well as a powerful programming language that can leverage web technologies as well as access to content on the local file system.

The installation of an AIR application requires the prior installation of the AIR runtime. AIR applications and the AIR runtime are conceptually similar to Java applications and the Java runtime; in order to run the application, the runtime must be installed. The AIR runtime is a quick and easy install, and may already be installed on your computer since it is installed along with many current Adobe products. AIR applications are delivered as a file with a .air extension. The same .air file can be installed on Windows, Mac, and Linux systems.

AIR is based on Open Source technologies, including Flex (ActionScript and MXML), WebKit, SQLite, and Flash. Everything that you need to develop and create an AIR application is available as a free download from adobe.com (Flex and AIR SDKs). Because AIR applications are Unicode enabled, they support all languages, however the current installer supports only 16 languages. The types of applications that can be developed with Adobe AIR are essentially unlimited. Adobe provides the Adobe AIR Marketplace where people can offer their AIR applications to others.

What is AIR Help?

AIR Help is a term that refers to any user assistance application created with the Adobe AIR development technology. In practice, this is more of a concept than a tangible thing. Because AIR is so flexible, each Help system developed using this technology may provide very different features. Unlike some Help technologies, when someone says they’ve got an AIR Help system, you really have no idea what features that Help system may have. The functionality common to all AIR Help systems is that they are all locally installed on the end user’s computer. Remember that AIR is a technology for creating desktop applications; AIR is not installed on a server and although an AIR application can leverage web technologies it is itself not a web application. You might think of AIR Help as a highly customized web browser (although, for some situations it may be designed to limit access to the local file system).

I coined the term “AIR Help” in 2007 after learning about Adobe’s new AIR technology. Because of the relative ease of development and the ability to incorporate web and local file system components, AIR seemed like the ideal platform for the development of user assistance applications.

There are currently two commercially available tools for creating AIR Help, Adobe’s RoboHelp 8 and MadCap Software’s Flare 6 (also Flare 4 and 5). Adobe also provides a utility called RoboHelp Packager for AIR, for creating AIR Help from RoboHelp 6 or 7 webhelp files. If the features offered by the commercial tools don’t provide the functionality that you’re looking for, you can create your own custom AIR Help system. Sample custom AIR Help prototypes are available from leximation.com. Leximation is also developing a DITA to AIR Help plugin for the DITA Open Toolkit as well as a utility for creating AIR Help from CHM (HTML Help) source files.

I’m hoping that other Help Authoring Tool vendors will throw their hats into this arena and show us what they can do with AIR. If you’re using a HAT that doesn’t export to AIR, tell them that you’re interested in seeing what they can do with this technology.

Benefits of AIR Help

As mentioned earlier, AIR Help is cross-platform, so you can install the same .air file on Windows and Mac systems as well as a number of Linux distributions (Fedora, Ubuntu, and OpenSuse). (See adobe.com for details on system requirements.) The AIR Help package is contained within a single .air file, making it easy to deliver to end users. AIR provides a built-in update mechanism. This means that you can ship an early version of your Help, then once the documentation is complete you can upload the updated .air file to your website, and your users will be notified that a new version is available. The update process is quick and easy.

AIR provides an embedded browser component that is built from WebKit (the technology underlying the Safari browser). HTML content that is rendered in an AIR Help system will use this browser instead of one that’s installed on the user’s computer. This means that any CSS and JavaScript that you use in your HTML only needs to be designed for that one browser, WebKit. No need for “browser sniffing” code, and no need to worry about testing on multiple browsers. To me, this is a HUGE benefit of AIR Help over other user assistance options. If you’re currently delivering a “webhelp” system, you probably spend a lot of time developing for and testing on multiple browsers, then get a little worried when another browser comes out that you haven’t tested on. With AIR Help there’s no need for that extra time or worry.

AIR provides many features that make it easy to seamlessly leverage web-based content and data. And because AIR can read from (and write to) the local file system, if you’ve created a custom AIR Help system, it could be designed to monitor the current state of your user’s interaction with the software application you’re documenting. With a custom AIR Help system you could also perform dynamic filtering of content based on the user’s role or input. This has the potential to provide truly a useful, interactive, and intelligent Help system, something people have been striving for since online Help was invented.

All AIR applications must be digitally signed by the publisher. This is seen by some as an annoyance, but really isn’t that big of a deal. During development, you can use a “self-signed” certificate, and when you’re ready to ship, you just need to purchase a certificate from one of the many certificate vendors. An AIR code-signing certificate costs $150 or more per year, and gives your end users the comfort of knowing where the application actually came from.

Last but not least, because AIR is built on Open Source technologies it costs nothing to start exploring custom AIR Help development. Serious development is typically done with Adobe’s Flash Builder (previously called Flex Builder), but it’s easy to get started using just a simple text editor. There are other development environment alternatives such as Aptana Studio that may be worth looking into.

Adobe RoboHelp AIR Help Output

Adobe RoboHelp 8 natively exports an AIR Help deliverable that provides many nice features without the need to do any coding or development. It provides all of the typical features that you expect in an online Help system, such as Contents, Index, Search, Glossary, Favorites, Print, and Forward/Back buttons. It supports context sensitive Help calls, and offers a handful of skins and themes to customize the appearance. The search results include a snippet from the topic (like Google) to provide additional information. The AIR-based auto-update feature is available, as well as the ability to include additional web-based content on Resource tabs and via an RSS feed. One fundamental feature that is lacking is window size and position persistence; when I position my Help window, I like to see it appear at the same location and size the next time I run Help.

RoboHelp’s AIR Help also provides a comments feature that allows end users within a domain (those with access to a common shared server) to share notes on the topics. These notes display combined in a panel at the bottom of the Help application. You can also make use of this comments feature during development as a review tool. Reviewers make notes on topics, then send you the comments XML file. You are able to review all of the comments from all reviewers and make corrections as needed. As you navigate topics, a mini-TOC panel displays links to the sub-headings within that topic. This is a great little feature that simplifies the authoring process as well as making it easier for users to navigate longer topics.

Even though AIR Help provides Help as a single deliverable, once installed the HTML and other system and support files are typically loose in folders within the application installation directory. RoboHelp offers an option to install a single file Help package as opposed to the loose HTML files. For those people still using RoboHelp 6 or 7, Adobe offers a free utility for creating AIR Help from a webhelp project; RoboHelp Packager for AIR.

MadCap Flare AIR Help Output

MadCap’s Flare 6 natively exports an AIR Help deliverable. Flare’s AIR Help is what I call a “wrapped” webhelp system. All of the features in this Help system are HTML-based, and does not take advantage of programmatic Flex or ActionScript coding. Basically, whatever features you can include in their webhelp output, you can include in their AIR Help output.

The standard AIR Help output includes the common features such as Contents, Index, Search, Glossary, Favorites, and Forward/Back buttons. Additional features like including web content or RSS feeds can be included by modifying the underlying webhelp project. MadCap does offer a Feedback Server application that can be used to provide a nice comment/feedback user experience. Unfortunately, Flare’s AIR Help does not provide the auto-update feature, and as with the RoboHelp AIR Help, Flare’s AIR Help window size and position are also not persistent.

Custom AIR Help Options

If you’re looking for features beyond those offered by RoboHelp or Flare, you’ll need to develop your own AIR application. There are two basic types of AIR applications, an HTML-based application or an MXML-based application.

For a user assistance application the HTML-based approach works well if you’d like to create a “wrapped” AIR Help system from an existing webhelp project. In general, you should be able to wrap your current set of HTML files and wrap them in an AIR container. This will let you leverage your existing Help development and take advantage of AIR’s embedded browser and simplified packaging and delivery options.

In order to make use of the programmatic controls and interface widgets provided by Flex and AIR, you’ll need to develop an MXML-based AIR application. MXML is an XML format used to arrange user interface components, similar to the way you can build an input form using HTML. In this type of application, ActionScript is used to handle events and dynamic interaction with the interface components. ActionScript is an object oriented programming language similar to JavaScript. Your application can be designed to take on the operating system’s look and functionality for the window elements, or it can be customized. You can even create windows that are a shape other than a rectangle.

Leximation is developing some AIR application code that provides the standard Help system features. This code is intended to be used as a framework from which people will customize, modify, and extend to develop a Help system that’s ideal for their users and products. These features include the standard navigation elements of Contents, Index, and Search, plus Forward/Back, Next/Previous, Home, and Sync with TOC buttons. Options include Auto-Sync, Keep on Top, and Check for Updates. The search functionality includes the ability to search a “remote” index, providing links to web-based content from a local search. This remote index can be generated from content such as your user forums or knowledge base articles, and can be updated daily or as needed. And as you might expect, this AIR Help application does provide persistent window size and position. Samples of prototype AIR Help files are available for download from leximation.com, most include the source files for you to experiment with.

Possible extensions to this framework might include, a commenting or feedback system, a topic rating system, or a chat module that lets users of your Help system chat with others. You might even set up a feature that lets end users extend and customize the Help system in certain ways. It’s even fairly easy to add a Twitter feed or allow the user to actually post tweets from AIR Help.

Leximation’s AIR Help framework will be available as a DITA to AIR Help plugin for the DITA Open Toolkit and as a utility to generate AIR Help from a CHM (HTML Help) project. If you’re interested in beta testing either of these options, please contact Leximation.

The Choice is Yours

Whether you choose to use a commercial tool to build your AIR Help or decide to try the custom route, using Adobe AIR as your Help delivery option can provide your users with a more interactive and useful user assistance experience. You might even find that AIR helps to blur the lines between your software application and online Help, and might just make your Help more helpful.

–Scott Prentice, Leximation, Inc.

Myth #2: FrameMaker is only appropriate for printed books

While it is true that FrameMaker excels at the creation of printed content and PDF files, there is absolutely no reason that it should be limited to the creation of chapter-based and book-centric content. FrameMaker works with files, you get to decide what those files represent .. books, chapters, sections, topics, or snippets. For years, people have been using FrameMaker along with tools like Mif2Go, WebWorks, and others, to create both PDF/print output as well as numerous online formats. In those workflows, people generally authored in unstructured, chapter-based files.

With the growing popularity of XML (and DITA in particular), FrameMaker can still be used to author content in a chapter-oriented paradigm, but it can also be used to author individual topics just as easily as any other XML editor. Using DITA maps to organize the topic files (which may represent books, chapters, or other collections). These map and topic can then be passed to external processing tools (like the DITA Open Toolkit) to be generated into specific deliverable formats, and can also be processed within FrameMaker to be assembled into books.

You might suggest that authoring in FrameMaker forces people to think in a book-centric manner because of the print format of the WYSIWYG authoring view. Although this may be the way you’ve seen FrameMaker used, this is completely up to you as the author to format the authoring view however it makes sense for your workflow and writers. When opening an XML file, you select a structure application to use, which applies a template which defined the way the content is rendered on screen. You can set up this structure application with a print-focused layout or you can choose to use fonts and a layout that looks very simple.

One example of this is found in the default DITA-FMx 1.1 Topic application which has no indents, uses Verdana as the font throughout and looks more like a web page than a printed book. If you choose to create a PDF from the DITA map and use the default Book application, the print formatting is applied. But while authoring, using the Topic application, you are encouraged to focus on the content rather than the formatting since it’s likely that you are creating deliverables for multiple output formats, of which print (PDF) is only one.

Just because FrameMaker has traditionally been the standard tool for authoring long documents doesn’t mean that it can’t be used for topic-based authoring as well. It is a very flexible and customizable authoring tool, which should be evaluated carefully with other tools when selecting an appropriate XML editor.

PDF Publishing with DITA-FMx 1.1

FrameMaker and DITA-FMx provide the easiest and least expensive way to get the highest quality PDF output from your DITA content. In addition to the numerous authoring features in DITA-FMx, it also provides many useful publishing options. Some of the more popular are listed below:

  • Add related links from relationship tables
  • Flatten conrefs and ensure that links are functional in PDF output
  • Apply ditaval filtering to the generated book files
  • Move figure titles so the follow the image
  • Enable table titles to display on all pages for tables that span pages
  • Assign proper numbering and pagination throughout the book
  • Replace “list” files with generated FrameMaker lists (e.g. TOC, Index)
  • Run custom scripts to perform additional pagination and cleanup

See how easy it is to get properly formatted PDF output from a DITA map using DITA-FMx. This video walks you through the basic process of configuring DITA-FMx for PDF publishing.

If you’re a new user of DITA-FMx or are considering a purchase, you should review this video.

» Link to video on YouTube.

Creating New Files in DITA-FMx 1.1

DITA-FMx offers some features that make new file creation simple and easy. Entering the title for the new topic in the New File dialog box automatically creates the file name based on a format that you have defined using special building blocks. You can also create new files using “element templates” which pre-populate the topic with boilerplate content that you have set up. Prolog metadata in new files can automatically be set with the author’s name and creation date, and each time you update a file, the revision date metadata can be automatically set.

This video introduces these and other features for creating new DITA files with DITA-FMx.

If you’re a new user of DITA-FMx or are considering a purchase, you should review this video.

» Link to video on YouTube.

Overview of the Map Authoring Features in DITA-FMx 1.1

DITA-FMx 1.1 provides a number of authoring features not available in standard FrameMaker 8 or 9. Some of these features are not available in other DITA editors, and are typically found only with a content management system. This video provides a quick tour of those features.

If you’re a new user of DITA-FMx or are considering a purchase, you should review this video.

» Link to video on YouTube.

DITA-FMx: Cloning the Default Structure Applications

If you’re using DITA-FMx and would like to modify the formatting and layout in the topic authoring view or for book publishing, you’ll need to modify the corresponding FrameMaker structure applications (Topic, Map, and Book). When it comes time to customize the structure apps, you should “clone” the default applications provided with DITA-FMx to create your own applications rather than modifying the default apps. This video walks you through each step of this process.

This is a fairly complex topic involving the modification of the structure application definition file (structapps.fm) as well as the structure application’s EDD and template files. If you’re just starting out, it’s probably best to work with the default applications for some time before worrying about any customizations.

» Link to video on YouTube.

Installing DITA-FMx 1.1

This video walks you through the complete process of installing DITA-FMx in FrameMaker. It also demonstrates the installation of the default structure applications and creation of a new DITA topic.

This video is useful for those who’d like a quick overview of the installation process. It also shows you the easy way to install new structure applications.

» Link to video on YouTube.